
Data Retention is a company-level setting that lets you choose whether sanctions.io keeps a history of your team's searches and screening results, and for how long. It's off by default, so nothing is stored unless you turn it on.
Because retention involves storing personal data, you must review and accept sanctions.io's Data Processing Agreement (DPA) to enable it; it isn't just a toggle.
Monitoring users
Enabling this configuration does not change Monitoring behavior. Monitoring data retention and screening frequency are unaffected and continue as specified in your contract.
Topics Covered
→ What Data Retention Does
→ Enabling Data Retention
→ Choosing a Retention Period
→ Where Retained History Appears
→ Generating a PDF Report
→ Disabling Data Retention
What Data Retention Does
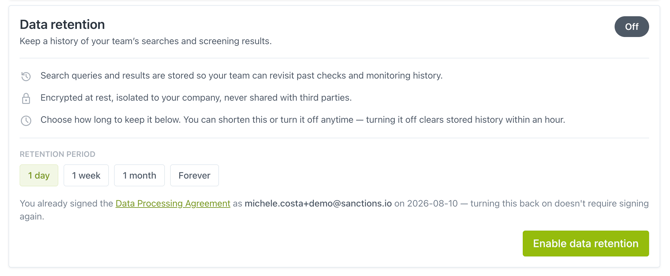
When enabled, sanctions.io stores a history of the searches and screening results run by everyone on the company account, so users can revisit past checks in Single Screening and Batch Screening.
- Data is encrypted at rest, isolated to your company, and never shared with third parties.
- Stored history is per-user — your searches aren't visible to other users in your company.
- You can shorten the retention period or turn retention off entirely at any time.
Enabling Data Retention
- Go to Settings → Company → Data Retention.
- Click Enable data retention.
- Review the Data Processing Agreement (DPA).
- Select your retention period (see below).
- Confirm both checkboxes:
- I am electronically signing this Data Processing Agreement on behalf of the company.
- I hold Administrator or Owner permissions on this account at the time of signing.
- Click Sign & submit.
Important: Only users with Administrator or Owner permissions can enable Data Retention.
Once submitted, the request shows as Pending while it's processed. You can cancel before it takes effect. Once active, the status shows On, and the account records who agreed and when (for example, "Agreed by [email] on [date]") for a clear compliance trail.
Choosing a Retention Period
You can choose how long searches and screening results are stored:
- 1 day
- 1 week
- 1 month
- Forever
You can change the retention period at any time from Settings → Company → Data Retention.
Where Retained History Appears
Once Data Retention is enabled, stored history appears in the Recent screenings panel on your main Dashboard. This shows, for each screened name:
- Identifier
- Country
- Watchlist source
- When it was last screened
- Number of matches
Note: This view is per-user and isn't shared with other users in your company.
Generating a PDF Report
From your stored search history, you can generate a PDF report — giving your compliance team an exportable, shareable record for audits or internal documentation.
- Go to your Dashboard.
- In the Recent screenings panel, click a screening to open its search details.
- Click Export PDF in the top-right corner.
Disabling Data Retention
- Go to Settings → Company → Data Retention.
- Click Disable data retention.
- In the confirmation dialog, click Disable data retention to confirm, or Cancel to keep retention on.
Note: Stored history is cleared within an hour of disabling.
We're here to help!
If you have any questions or need more help, please contact our support team anytime!
- Chat: Available directly through the Help Center page
- Email: help@sanctions.io