Overview
Batch Screening allows you to efficiently screen a high volume of records in your Salesforce system in a single operation. Whether you're working with hundreds or thousands of records, this feature streamlines the compliance process by eliminating the need for manual, one-by-one screening. It's especially useful for handling large datasets quickly and consistently, ensuring broad coverage across your CRM without sacrificing performance or accuracy.
Benefits
Automation & Targeting: Use the query generator to define subsets of records, then start a batch scan with a single click.
Traceability: Each scan generates a Batch History table, providing full visibility into past runs.
Reporting: Build reports to track and analyze screening alerts generated from each scan.
Initial & Ongoing Compliance: Screen all records upfront to set a compliance baseline, and re-scan regularly to catch new risks.
Topics Covered
Best Practices and Considerations
- To stay compliant, it's best practice to regularly re-screen records. You can run a periodic batch screening by filtering on the Last sanctions.io Screen Date field.
- We recommend using standard Salesforce reports, which you can customize to show the fields you care about. Update the Batch ID filter to view results from different batch runs.
Create SOQL Query
Our interface provides a simple way to define a SOQL (Salesforce Object Query Language) filter that selects a subset of records for batch screening. Once the initial query is created, you can customize and expand it to include more complex logic, giving you complete control over which records are screened.
Find more details about the available filter types.
⚠️ Important: Your query must include both the Id and Name fields in the SELECT clause to ensure proper record identification during screening.
For advanced users, the manual query builder supports chaining multiple conditions using AND/OR logic, allowing for more precise targeting of your dataset.
1. On the Screening Setup page, navigate to the Batch Screening tab to begin configuring your batch screening criteria.

2. From the Object dropdown menu, select the Salesforce object that contains the records you want to include in the batch screening.

3. Now, select a field to use in the WHERE clause. This field will define the condition used to filter records from the selected object.
Depending on the field's data type (e.g., text, number, date, picklist), different filter options will be available. For example, you might filter by Last sanctions.io Screen Date, CreatedDate, or Account Type (Type) to narrow down which records should be included in the batch screening.
Once a field is selected, you'll be able to specify the operator (e.g., equals, contains, greater than) and the value to match against.

4. After setting your filter criteria, click Generate Query. This will automatically build a SOQL query based on your selected object, field, and filter conditions.
You can review and, if needed, manually edit the generated query to add more complex logic, such as combining multiple conditions with AND/OR.

5. Next, click Start Batch. A pop-up window will appear, displaying the number of records that match the criteria defined in your query. Review the count, and if everything looks correct, click Start Batch again to begin the screening process.


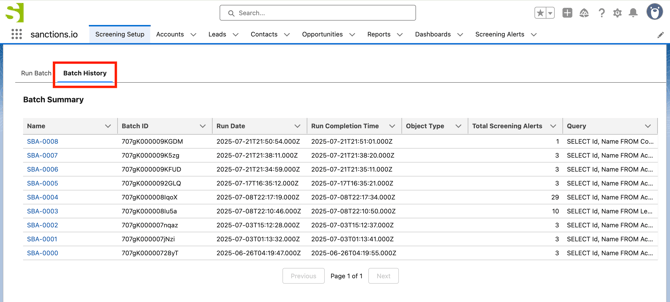
What to Expect After Starting the Batch
Once the batch screening begins, our system will process the selected records and check them against the latest sanctions lists.
You can monitor the progress in the Batch History table. After initiating a batch run, its Run Date will appear in the table. When the Run Completion Time is populated, it indicates that the batch has finished processing.
You can also check the status of your batch runs by going to the Apex Jobs tab in Salesforce Setup and searching for the current run status of your submitted batches.

Once complete, the Batch Summary will display: Batch ID, Object Type, and Total Screening Alerts (if any matches or potential alerts were found).
Screening alerts generated from a batch run are linked by their shared Batch ID, making it easy to identify.


All screening activity is logged to ensure full auditability and compliance tracking. Please note that batch processing times may vary depending on the dataset size, but results typically appear in near real-time.
Create Reports for Batch Screening Results
In this section, we'll guide you through creating standard Salesforce reports to help you view and analyze the results of individual batch screenings.
For better organization and clarity, we recommend setting up a separate report for each object type: Account, Contact, and Lead.
1. In this example, we'll create a report for the Account object type. To get started, go to the Reports section and click New Report.

2. Under the Category, scroll down to Other Reports, click on it to view Report Type list and find the option labeled “Screening Alerts with <Object>” (e.g., Screening Alerts with Account). Then, Start Report.

3. Use the left-hand panel to browse and add fields to your report. You can include any fields relevant to your workflow. A good starting point is <Object: Object Name>, Person Name, Data Source, and Score.


We also recommend grouping rows by <Object>: <Object ID> to display all screening alerts related to the same record together.

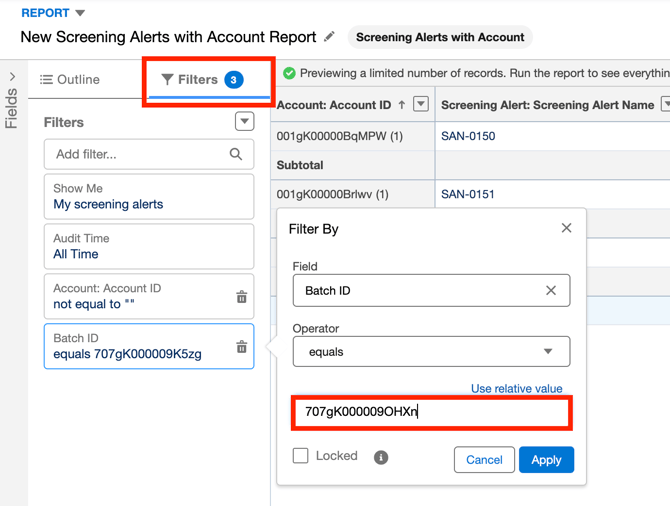
4. Under Filters, add two key filters:
- <Object: Object ID> not equal to (blank) - This ensures the report only includes screening alerts related to that specific object type.

- Batch ID equals (a specific Batch ID) - This will filter the report to show only alerts from that batch run you want to view results for.

5. Once your fields and filters are configured, select Save & Run in the top menu.

6. You’ll be prompted to name, add description (optional), and select a folder. After saving, the report will run automatically, displaying the results for the selected batch run.

Report with batch results.

View All Screening Alerts from All Users
Under Filters, the report includes a "Show Me" option, which defaults to showing only alerts you own. To view alerts created by all users across all batch runs, change this setting to "All Screening Alerts."

Reuse a Report for New Batch Runs
Once you've configured the fields and filters to suit your workflow, you can reuse the report as a standard template for future batch screenings. Simply access it from the Reports tab and update the Batch ID filter to view results from a new batch run.
1. From the Reports tab, locate your report, click the dropdown arrow next to it, and select Edit.
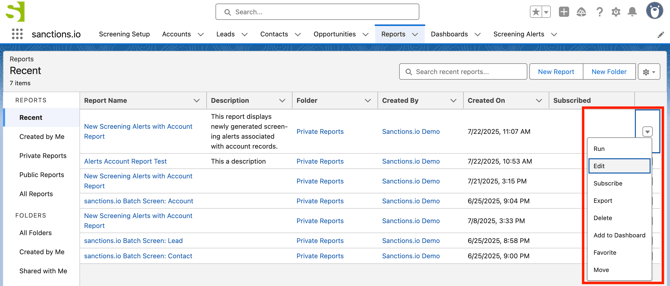
2. In the Filters section, update the Batch ID to match the new batch you want to review and then Apply.
3. Click Save & Run to refresh the report with the updated results.
Please note that we recommend creating separate standard reports for each object type: Account, Contact, and Lead.
Data Filters
The filter builder includes built-in support for common data type operators, so no additional setup or customization is needed.
If you're writing a query manually, you can also use any operators that are natively supported by Salesforce Object Query Language (SOQL). For a deeper dive into SOQL and advanced filtering options, please refer to the Salesforce Guide.
Comparison Operators
You can use comparison operators in the field expression of a WHERE clause. These operators are supported in both manual SOQL queries and the filter builder, where applicable.
= Equals |
<= Less or Equal |
!= Not Equals |
LIKE Contains |
> Greater Than |
NOT LIKE Does Not Contain |
< Less Than |
IN Matches any value in a list |
>= Greater or Equal |
NOT IN Does not match any value in a list |
Once generated, you can modify any query to <fieldName> = null if you wish to filter records where a particular date field is empty.
SELECT Id, Name FROM Account WHERE CreatedDate = null
- You may also input
!= nullto find records where the input is not empty.
Data and Field Types
The WHERE clause in a SOQL query allows you to filter records based on specific conditions. However, the availability of these operators can vary depending on the field type you're filtering against.
Some field types support a full range of comparison operators, while others are more limited in what they allow. We’ll walk through the different field types and the operators supported for each.
Checkbox
You can filter records based on whether a checkbox field is set to true or false. For example, to filter records already screened by sanctions.io:
SELECT Id, Name FROM Account WHERE Sanctions__Sanctions_Run__c = true
Date
A date picker will be available to filter records based on the chosen date, allowing you to select records where the date field is equal to, not equal to, greater than, or less than your selected date.
Date/time
A date/time picker will appear, allowing you to filter records where the selected date/time field is equal to, not equal to, greater than, or less than the chosen value.
Number
A numeric input will be provided, allowing you to filter records where the selected number field is equal to, not equal to, greater than, or less than the value you enter. This input also accepts decimal and negative numbers.
Text
A free-form text input is provided, allowing you to filter records where the selected text field = equals or != does not equal the entered value.
- The
LIKEoperator searches for all records that contain the specified text in the given text input. - You can reverse the
LIKEoperator by selectingNOT LIKE(does not contain), and a "NOT" will be shown in front of the field in theWHEREclause.
SELECT Id, Name FROM Account WHERE NOT Name LIKE '%test%'
NOT INperforms the reverse. It filters for records that do not match any of the specified values.SELECT Id, Name FROM Account
WHERE BillingCountry NOT IN ('Canada', 'France')
ℹ️ Note: Salesforce SOQL does not support textarea fields.
Picklist
- When using Equals or Not Equals with a picklist field, you select a value from the list to filter records that either match or do not match that selection.
- When using Like or Not Like, the filter includes records that either contain or do not contain the specified value. Advanced users can modify the expression to capture a different set of records by adjusting the pattern used in the condition.
For example, change the expression toStatus LIKE '%Closed%'to include all leads with a status such as "Closed - Converted" or "Closed - Not Converted".SELECT Id, Name FROM Lead WHERE Status = '%closed%' - The
INoperator lets you enter a comma-separated list of values to filter records whose picklist field matches any of the values in the list.
SELECT Id, Name FROM Account
WHERE BillingStateCode IN ('Colorado', 'New Jersey', 'Utah')
Multi-Select Picklist
The following operators are supported when querying multi-select picklist fields:
Includes and Excludes are more flexible. If the record contains any of the selected values, it will be considered a match.
We're here to help!
If you have any questions or require further assistance, please don't hesitate to reach out to our support team.
-
Chat: Available directly on the Help Center page
-
Email: help@sanctions.io