Discover how to add and set up screening fields on your Salesforce page layouts, allowing your team to easily view when a record was last screened, who performed the screening, and any related alerts. You can also display alerts in related lists, making results clear, visible, and actionable for your team.
Topics Covered
→ Adding Screening Fields to Page Layouts
→ Adding Screening Alerts to the Related List
Best Practices and Considerations
Screening callouts from Salesforce are asynchronous, meaning there may be a short delay between record creation and the completion of screening. To confirm whether a record has already been screened, refer to the "Screened by sanctions.io" field. This field helps verify that the screening process has completed, whether triggered automatically or initiated through another method.Adding Screening Fields to Page Layouts
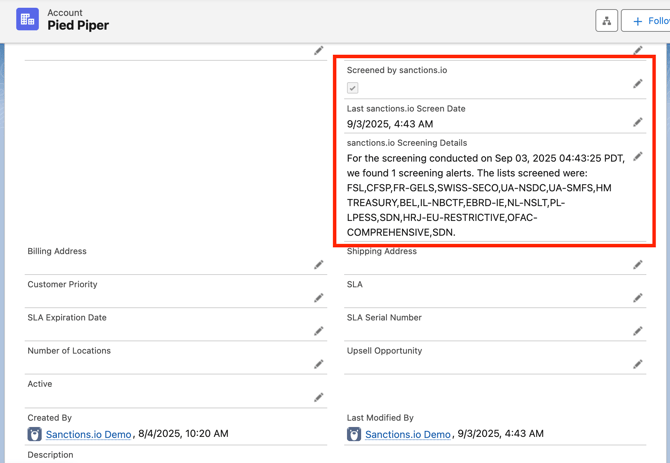
To make screening activity more transparent and actionable for your team, you can add key sanctions.io fields directly onto your Salesforce page layouts. These fields provide an at-a-glance view of when a record was last screened, whether it passed checks, and a summary of any results found.
We recommend adding the following three fields to your page layouts:
- Screened by sanctions.io – A checkbox showing that the record has been screened.
- Last sanctions.io Screen Date – The timestamp that indicates the most recent date and time the record was screened.
- sanctions.io Screening Details – A text field that shows a summary of the most recent screening. In the example below, it displays:
- The exact screening date/time (Sep 03, 2025 04:43:25 PDT)
- That one screening alert was found
- The short codes of the lists that were screened
To display the latest screening information directly on your records, follow these steps:
1. In Salesforce Setup, navigate to Object Manager and select the object you want to update (e.g., Lead, Contact, Account). 
2. In the selected object, go to Page Layouts. Choose the layout you want to edit.
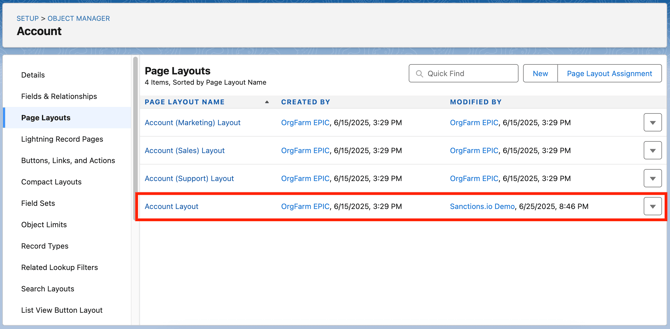
3. Find the following fields in the Fields panel:
- Screened by sanctions.io
- Last sanctions.io Screen Date
- sanctions.io Screening Details
Then, drag and drop them into a visible section of the layout. Click Save.

When Screening Fields Are Updated
These fields update with the most recent timestamp whenever a successful screening result is returned, regardless of how the screening was triggered.
Trigger-Based Screening
- Fields update automatically after a successful screening callout.
- This applies regardless of whether alerts are found.
Pop-Up Screening (e.g., via One-Click Button)
- Fields update only if alerts are found and saved.
- If the user cancels, the fields do not update.
Batch Screening
- Fields update once the batch process completes scanning.
- This applies regardless of whether alerts are found.
Adding Screening Alerts to Related List
Setting up related lists on your Lead, Contact, and Account records allows users to quickly view all saved screening alerts directly from the record page.
What Are Related Lists?
Related lists are a standard Salesforce feature that display records related to the one you're currently viewing. Since Screening Alert records are automatically linked to leads, contacts, and accounts when they're created, they will appear in the related list as soon as they're added to the page layout; no additional configuration is needed.
The following setup steps are the same for all three objects (Lead, Contact, and Account). This walkthrough will use the Lead object as an example, and you can repeat the same process for the others.
1. In Salesforce Setup, go to Object Manager. Search for and select Lead (or Contact/Account, depending on the object).

2. In the left sidebar of the object setup, click Page Layouts. Choose the layout you'd like to edit (e.g., Lead Layout).

3. In the layout editor, scroll to the Related Lists section in the component panel. Then, drag the Screening Alerts related list onto the layout (typically under existing 'Related Lists').
 4. Click Save in the layout editor to apply your changes. Once saved, the Screening Alerts related list will appear on the record page for users, displaying all screening alerts associated with that record.
Customize the Screening Alerts Related List (Optional)
We recommend adding the most commonly used fields to the Screening Alerts related list to provide users with a quick, high-level overview of each screening result. For more detailed information, users can simply click into any individual Screening Alert record to view all available fields.
1. Click the wrench icon on the Screening Alerts list to customize visible columns.

2. You might include columns like Person Name (also used for account names), Data Source, Score, Compliance Audited?, and Created Date. Then, sort by the most recent Created Date.

3. Click OK to save column settings. Then, click Save in the layout editor to apply your changes.
That's it! Users can now easily view sanctions screening results directly on the record page, providing quick visibility into any potential alerts without needing to leave the layout.

❗Note: Only the first three fields you select for the related list will appear directly on the record page layout. All additional fields will be visible when users click "View All" to open the full related list table.
We're here to help!
We offer hands-on onboarding support and can guide you through configuring the integration to match your specific use case.
For any additional questions or further assistance, please don't hesitate to reach out to our support team.
-
Chat: Available directly in the portal or Help Center page
-
Email: help@sanctions.io
Related Articles
Manage Screening Settings in Salesforce