This guide walks you through the configuration options on the sanctions.io Screening Setup page in Salesforce.
Use screening settings to control how records are checked against sanctions lists. You can set confidence thresholds, decide which objects are screened automatically, choose data sources, and add high-risk jurisdiction (HRJ) lists. Map additional search parameters to improve match accuracy and reduce false positives.
Topics Covered
→ Additional Search Parameters
Best Practices and Considerations
- It's recommended to disable triggers when performing bulk data insertions, such as with the Salesforce Data Loader. These records are better handled through Batch Screening, which is optimized for processing large volumes efficiently.
- Screening results are influenced by the global configuration of the sanctions.io app. Make sure your configuration aligns with your organization's compliance requirements.
-
Only matches above your configured threshold will be returned.
-
Results are limited to the lists and datasets selected in the global settings.
-
- After configuring these settings, test with sample records to confirm that screenings run as expected.
Confidence Score
The confidence score threshold determines the minimum score a match must meet to be included in the results. For instance, if the threshold is set to 0.88 and a screening alert scores 0.85, the alert will not be shown.

Setting the Confidence Score
1. Go to Screening Setup → Screening Settings and then Threshold.
2. Enter a decimal value between 0.80 and 0.99 (e.g., 0.88).
Recommendation: Start with 0.88 to balance reducing false positives while still capturing likely matches.
3. Adjust the score based on your organization's risk tolerance:
- Higher (e.g., 0.90+) → Stricter results with only high-confidence matches
- Lower (e.g., <0.88) → Broader results, but expect more false positives.
5. Scroll to the bottom and click Save to apply your changes.
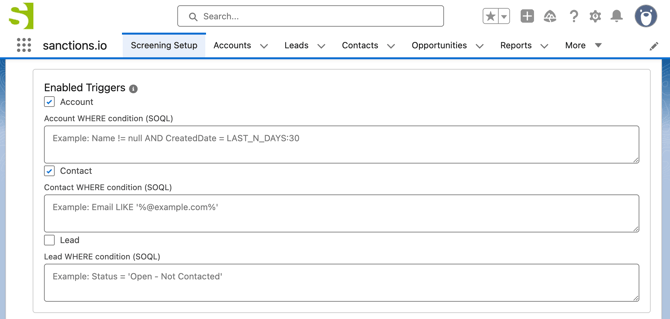
Enabled Triggers
This setting determines which Salesforce objects are automatically screened when they are created. Use triggers to ensure critical records are monitored for compliance in real time, keeping your data up to date and audit-ready.
Enabling Triggers for Objects
1. Go to Screening Setup → Screening Settings, and navigate to Enabled Triggers.
2. Check the box for each object you want to screen automatically when created (e.g., Lead, Contact, Account).
3. Scroll to the bottom and click Save to apply your changes.
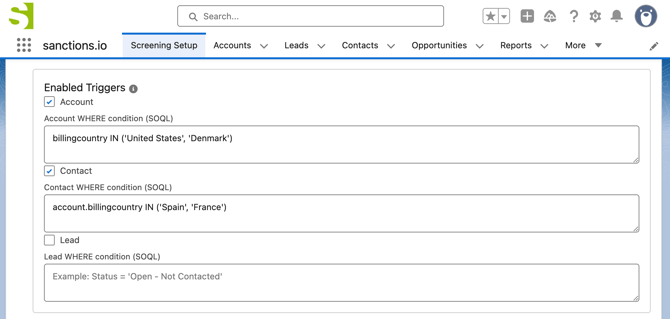
Applying Filters to Triggers
You can customize how triggers behave by applying filters that limit which records are automatically screened. Instead of screening every new record, you can define SOQL conditions to include only records that meet specific criteria. This helps focus your screenings on relevant data, reducing unnecessary processing.
1. Go to Screening Setup → Screening Settings, and navigate to Enabled Triggers.
2. For each enabled object, enter a WHERE condition (SOQL) that defines which records should be screened.
3. Click Save to apply your filters.
In the example below:
- Accounts are screened automatically only when the billing country is United States or Denmark.
- Contacts are screened only when their related Account’s billing country is Spain or France.
Enabled Data Sources
The Data Sources settings allow you to select which sanctions and whatchlists will be used during screenings in Salesforce. Update this setting at any time to adjust your screening coverage.

Selecting Lists
1. Within Screening Setup → Screening Settings tab, go to Enabled Data Sources.
2. Use the tabs to navigate by Region (North/South America, Europe, Asia, Africa, Oceania), International, and Custom (HRJ lists). Click a tab to view the lists available for that scope.
3. Enable/disable lists using the checkboxes or use Select All/Deselect All to manage them quickly. For the Custom tab, follow the instructions in the 'Enabling High-Risk Jurisdictions Lists' section (see below).
4. Repeat steps 2–3 for any other lists you want to select.
5. Scroll to the bottom and click Save to apply your changes.
Custom & High-Risk Jurisdiction (HRJ) Lists
Use the Custom tab to enable the High-Risk Jurisdiction lists and extend your screening coverage. Refer to Watchlist Coverage to view all HRJ lists covered by sanctions.io.
Important: HRJ lists require a valid Country field in the Additional Search Parameters (see below). Without it, no HRJ results will be returned.
Enabling High-Risk Jurisdictions Lists
1. In Enabled Data Sources, click the Custom tab.
2. In Custom Data Source, enter the HRJ short codes separated by a semicolon (e.g., HRJ-EU-Restrictive; OFAC-Comprehensive).

3. Click Validate to check the entries. Invalid codes are removed automatically.

4. Scroll to the bottom and click Save to apply your changes.
Request Additional Lists
sanctions.io can also support other custom lists in Salesforce. Please contact our Support Team at help@sanctions.io to learn how we can enable and integrate additional data sources for your compliance needs.
Additional Search Parameters
Additional parameters allow you to map more record details, improving screening accuracy and reducing false positives.
Supported fields include:
- Date of Birth (Lead, Contact): Allows you to select fields of the Date, Datetime, Formula(Date), or Formula(DateTime) data types.
- Year of Birth (Lead, Contact): Allows you to select fields of the Text, Number, Formula(Text), or Formula(Number) type. Must be a valid 4-digit year (1900 or later).
- Country (Lead, Contact, Account): Allows you to select fields of the Text, Address, Formula(Text), or Picklist data types. Required when screening against HRJ lists.

Mapping Additional Search Parameters (Account)
1. Go to Screening Setup → Screening Settings and go to Additional Search Parameters.
2. Select the Account tab.
3. Under Country, open the dropdown menu. Choose the field you want to map (e.g., Billing Country).
4. (Optional) If you need to clear your choice, click Clear Selection.
5. Scroll to the bottom and click Save to apply changes.
Mapping Additional Search Parameters (Lead & Contact)
1. Go to Screening Setup → Screening Settings and then Additional Search Parameters.
2. Select either the Lead or Contact tab.
3. For Date of Birth, open the dropdown and choose the field to map.
- Supported types: Date, Datetime, Formula(Date), Formula(DateTime).
4. For Year of Birth, open the dropdown and choose the field to map.
- Supported types: Text, Number, Formula(Text), Formula(Number).
- Value must be a valid 4-digit year (1900 or later).
5. For Country, open the dropdown and choose the field you use to store the country.
- Supported types: Text, Address, Picklist, Formula(Text).
- Required if you plan to screen against High-Risk Jurisdiction (HRJ) lists.
6. (Optional) Use Clear Selection under any field to reset your choice.
7. Scroll to the bottom and click Save to apply your changes.
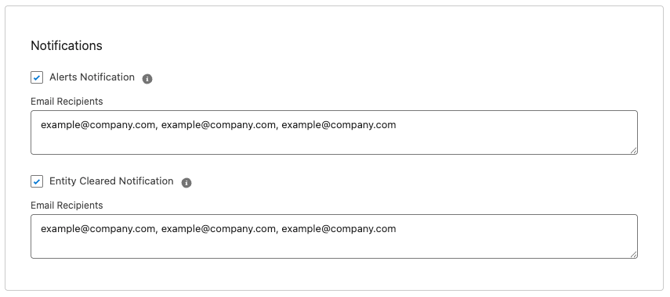
Notifications
Use Notifications to receive email updates about changes in screening results for individuals and entities. Notifications help you stay informed about newly identified alerts or when previously flagged entities are cleared.
Please note that in the sanctions.io screening process:
-
Leads and Contacts are treated as 'Individuals'
-
Accounts are treated as 'Entities'
Alerts Notification
Sends an email notification when a new match is found for a record against the selected screening lists.
Entity Cleared Notification
Sends an email notification when a previously flagged record no longer matches the selected screening lists.
This notification helps confirm when a record's screening status has changed, and alerts are no longer present.
Notification Recipients
Specify who should receive notification emails.
-
Enter one or more email addresses
-
Separate multiple email addresses with commas
-
Maximum length: 255 characters
Example:
user1@example.com, user2@example.com
Tip: Make sure recipient email addresses are correct and kept up to date so notifications are delivered successfully.
We're here to help!
We offer hands-on onboarding support and can guide you through configuring the integration to match your specific use case.
For any additional questions or further assistance, please don't hesitate to reach out to our support team.
-
Chat: Available directly in the portal or Help Center page
-
Email: help@sanctions.io
Related Articles
Configure Screening Fields and Related List