
Monitoring is sanctions.io's continuous screening tool. It automatically re-screens the individuals and entities you're tracking against the latest sanctions and watchlist data, and alerts you the moment something changes.
Benefits
- Always-On, Hands-Off: No need to manually re-run screenings or remember to check back. sanctions.io handles re-screening in the background as long as the entry remains on your list.
- Real-Time Alerts: If a new match occurs, Monitoring sends an alert and creates a detailed page with confidence scores, list source, and relevant metadata.
- Alert Management: Review alerts and mark them as "False Match" or "Real Match" directly in the portal to streamline your compliance workflow.
- Single & Batch Additions: Add a single entry or upload a batch file using our Screening Template.
- User Interface & Reports: An intuitive dashboard helps you manage monitored entries, track status activity, and download reports.
In this article:
→ Access Monitoring
→ Dashboard Overview
→ Start Your Monitoring List
→ Best Practices
Access Monitoring
- Go to app.sanctions.io/login.
- Log in with your email and password (or SSO if enabled).
- On the left navigation menu, click Monitoring.
Dashboard Overview
The Monitoring dashboard gives you a live view of everything you're tracking.
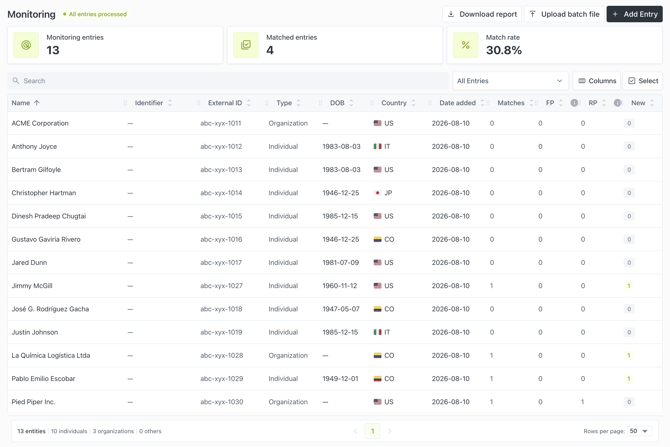
Top Summary Cards
- Monitoring entries → The total number of entries currently being monitored.
- Matched entries → The number of entries that have at least one match.
- Match rate → The percentage of monitored entries that resulted in a match.
Toolbar
- Search → Search monitoring entries by full or partial name.
- All Entries dropdown → Filter the list by match status: All Entries, Real matches, False matches, New matches.
- Columns → Show or hide table columns.
- Select → Enable checkboxes on the table for bulk selection. Once one or more entries are selected, a Delete (n) button appears in the toolbar to remove them.
- Download report / Upload batch file / + Add Entry → Top-right action buttons for exporting, batch uploading, and adding a single entry.
Monitoring List
The table below the toolbar includes:
| Column | Description |
|---|---|
| Name | The name of the individual or entity being monitored |
| Identifier | An additional unique identifier, such as a passport number, national ID, or registration number |
| External ID | Your internal reference ID, provided when the entry was added. If not provided, the system generates one by default. |
| Type | Individual, Organization, Vessel, or Aircraft |
| DOB | Date of birth (individuals only) |
| Country | Country associated with the entry |
| Date added | The date the entry was added to Monitoring |
| Matches | Total number of matches associated with the entry |
| FP | Number of matches marked False Positive |
| RP | Number of matches marked Real Positive |
| New | Number of newly identified, not-yet-reviewed matches |
Manage Columns
Click Columns in the toolbar to show or hide table columns. All 11 columns are visible by default; Name is required and can't be hidden. Click Reset to restore the default view.
Your column selections are saved and persist across sessions.
Notifications
Click Notifications in the left sidebar to open a panel showing your recent alerts and system messages — for example, completed batch uploads or downloadable report exports. A count badge on the sidebar item shows how many notifications are pending.
Start Your Monitoring List
Getting started with Monitoring begins with preparing and uploading your existing dataset. This creates a baseline and ensures your current dataset is covered from the start.
1. Prepare Your Initial Dataset
Before uploading, compile a complete list of all entries that require monitoring, including customers, partners, and vendors.
- Perform data quality checks to ensure all required fields are complete, accurate, and correctly formatted.
- Resolve duplicates or inconsistencies before uploading to avoid errors and unnecessary noise.
Note: We recommend reviewing Screening Template: Prepare and Format your Data before uploading.
2. Upload Your Initial List
Click Upload batch file in the top-right toolbar to open the Upload monitoring file modal.
- Use our XLSX template to format your entities — click Download XLSX template if you need it.
- Click Upload file to submit your batch.
- Each batch supports up to 8,999 entries plus one header row (9,000 rows total).
- Valid entries are screened against all enabled lists. Once processing completes, you'll receive a notification on the Notifications panel and via email (if email notifications are enabled on your account).
3. Add New Entries Going Forward
After onboarding is complete, upload only new entries as they're created in your internal system. Don't re-upload your full dataset — this prevents duplication and keeps monitoring efficient.
See Delete & Update Monitored Entries for how to handle updates to existing entries.
Best Practices
- Include an External ID whenever possible: This is the most reliable way to trace monitored entries back to your internal systems.
- Use quality data: Full names, DOB, country, and other identifiers reduce false positives/misses.
- Confidence score: We recommend 0.88 for a good balance between false positives and potential matches.
- Keep your list current: Regularly remove outdated or irrelevant entries.
- Label alerts: Mark as False Match or Real Match and add notes to strengthen your audit trail.
- Data Storage and Security: Data is securely retained in our database for the duration of the service.
We're here to help!
- Chat: Available directly through the Help Center page
- Email: help@sanctions.io